Cascade and Inheritance
As the name Cascading Style Sheets suggests, CSS specifies the styles for a document in a cascading manner. But what exactly does cascading mean?
First it is important to understand that most elements in a document are subject to more than one style declaration. Sometimes these declarations are conflicting. If one declaration says an element should be red and another one says it should be green, the browser can only apply one of them.
The set of rules that determines which of these conflicting declarations to apply is called the cascade.
The User Agent Stylesheet
Every stylesheet that you, the author, add to a website, is called an author stylesheet.
Every browser, or user agent, also has its own user agent stylesheet. It makes sure that every document always has some sensible default styling, even without you writing a single line of CSS.
Thanks to the user agent stylesheet, all headlines have a bigger font size, and every link is blue and underlined. While these defaults are very useful, the rules of the cascade make sure that you can always overwrite them in your own author stylesheets.
If the user agent stylesheet says all links should be blue, but your author stylesheet says all links should be red, all links will be red.
Overwriting your own styles
The cascade is also important for when you want to overwrite your own styles. But why would you want to overwrite your own styles?
Imagine you are styling a document with some paragraphs. All these paragraphs should have green text, but one of them contains a warning, and should therefore be red.
Here is one way to do this:
<head>
  <style>
    p {
      color: green;
    }
    .warning {
      color: red;
    }
  </style>
</head>
<body>
  <p>I am a normal green paragraph of text.</p>
  <p>I am another normal green paragraph of text.</p>
  <p class="warning">Warning! I am a red paragraph of text!</p>
</body>
In this example, the first rule specifies that all paragraphs have green text. The second rule overwrites the first rule wherever class="warning" is applied.
This is a good example why you would want to overwrite your own styles: Apply generic default styles for all elements first, then overwrite some of them to create exceptions.
If you think that is all very complicated, you are not wrong. Thankfully, computers are much better at figuring these things out than humans.
Developer Tools to the rescue
Developer tools are our best friends when building websites. They can give us a lot of feedback about the elements on a web page.
One great developer tool is inspect element.
The basic idea behind inspect element is that you can click any element on a page and your browser will tell you a lot of useful things about it. For example which styles are assigned to the element.
Inspect element or something similar is available in all modern browsers. In Chrome and Firefox you just need to right click on the page and select Inspect Element from the context menu. If you are using Safari you first need to enable developer tools in the browser. If you are using Edge, inspect element is called DOM Inspector. You also need to enable it first in the f12 Developer Tools menu.
You can read more about how to use developer tools in your browser using the following links:
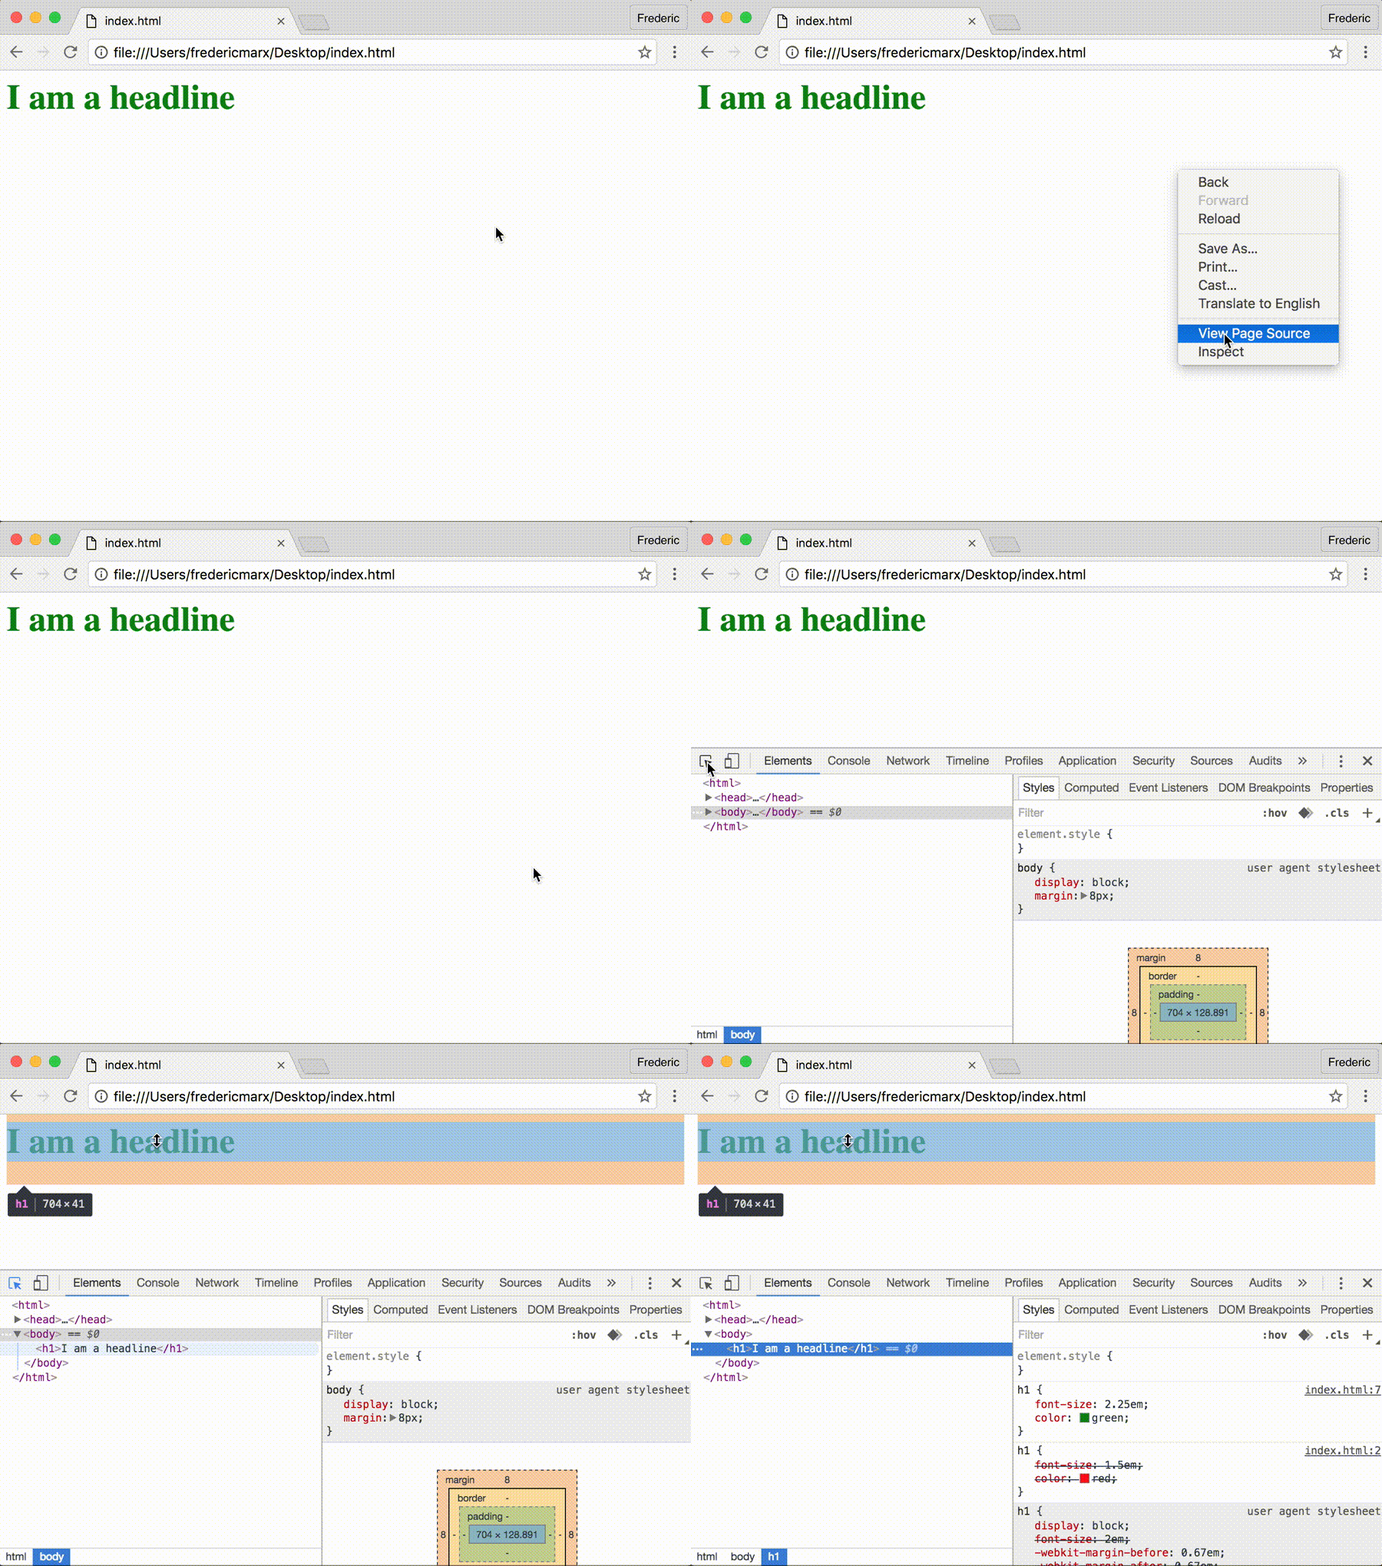
Here is an animated gif of what inspect element looks like in Google Chrome:

The element inspector in Google Chrome Developer Tools

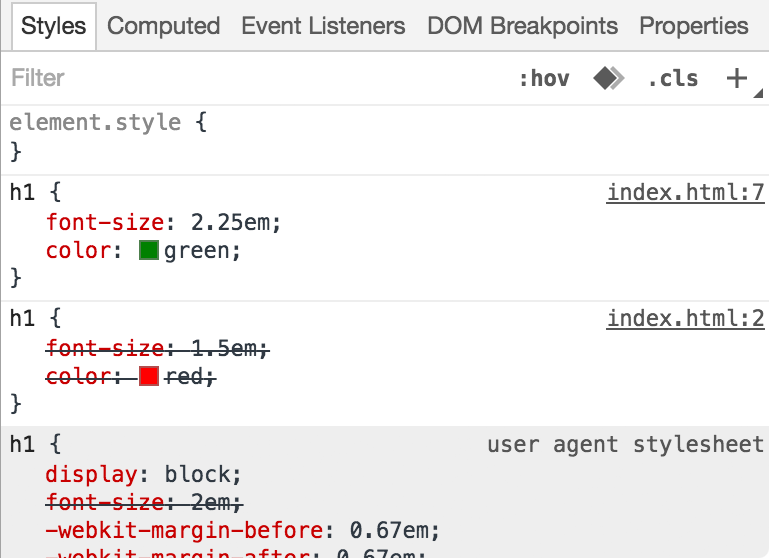
The styles panel shows you what styles are applied to an element and where to find them.
It also indicates overwritten styles as striked out
Parents, Children, Siblings, Inheritance
When we talk about an HTML document, we often describe it as a family tree. When an element stands between the opening tag and the closing tag of another element, it is wrapped inside another element. Elements that are wrapped inside another element are also called children. The tree of elements in a document is also called the DOM, and the elements in the tree are called DOM nodes.
Consider the following document:
<html>
  <body>
    <main>
      <h2>Web Browsers</h2>
      <p>Firefox is Mozilla's web browser.</p>
      <p>Chrome is Google's web browser.</p>
      <p>Safari is Apple's web browser.</p>
      <p>Edge is Microsoft's web browser.</p>
    </main>
    <footer>
      <h3>Learn more</h3>
      <p>Read the Wikipedia article about web browsers</p>
    </footer>
  </body>
</html>
For this document, the following statements are true:
h2is a child ofmainfooteris a child ofbodyh2is a sibling ofph2has four siblingsmainis a parent ofh2mainhas five childrenh2andmainare descendants ofbodyhtmlandbodyare ancestors ofpmainandfooterare wrapped inside abody-element- The
html-element is wrapped around thebody-element
One way we can make use of these relationships in our CSS is through inheritance. Inheritance means that some CSS properties, like text color or font size, get passed down, or inherited from parent to children and further descendants. So if we want all the text in our document to be green, instead of styling every single element we can add the following CSS:
body {
  color: green;
}
All visible elements in an HTML document are descendants of the body element. Therefore the color green now applies to every element on the page, as long as the element doesn’t have its own color property value.
Now let’s make this document a bit more interesting:
<html>
  <head>
    <style>
      body {
        color: green;
      }
      footer {
        background-color: green;
        color: white;
      }
    </style>
  </head>
  <body>
    <main>
      <h2>Web Browsers</h2>
      <p><a href="https://www.mozilla.org/en-US/firefox/new/">Firefox</a> is Mozilla's web browser.</p>
      <p><a href="https://www.google.com/chrome/">Chrome</a> is Google's web browser.</p>
      <p><a href="http://www.apple.com/lae/safari/">Safari</a> is Apple's web browser.</p>
      <p><a href="https://www.microsoft.com/en-us/windows/microsoft-edge">Edge</a> is Microsoft's web browser.</p>
    </main>
    <footer>
      <h3>Learn more</h3>
      <p>Read the <a href="https://en.wikipedia.org/wiki/Web_browser">Wikipedia article about web browsers</a></p>
    </footer>
  </body>
</html>
In this document, all elements without a specified text color will inherit the green text color from the body-element. The footer has its own white text color that overwrites the green text color from the body-element. It also has a green background color.
You will notice that the a-elements don’t inherit the text color of their ancestors. That is because the a-element has its own blue text color specified in the user agent style sheet.
Unfortunately, blue on green is not very readable. It might be a good idea to change the link color for the footer by adding the following CSS:
footer a {
  color: white;
  text-decoration: underline;
}
You might wonder why there is an empty space between footer and a in the footer a selector. This empty space is called descendant combinator. The descendant combinator lets you select elements that are descendants of another element.
This becomes a bit clearer when you read the selectors from right to left. footer a will select every a element, that is a descendant of a footer-element. You can also combine more selectors. For example footer h2 a would select every link inside of a level two headline that is inside of a footer.
Knowing this we can make sure that all our links inside the footer have a white text color. We also want to make sure that they are underlined with text-decoration: underline;. This way people can still recognize that they are links, not just regular text.
The inherit keyword
This is all well and good, but what if we decide to change the text color in our footer from white to yellow? In our example we would have to change the color values for footer and footer a to yellow to achieve this. Ugh, so much work!
Thankfully, there is the inherit keyword.
The inherit keyword forces some attributes, like color, to be inherited from the parent element. So in our example we could give our footer a the property value color: inherit;. This way the links inside our footer are always the same color as the text in our footer.
There is also the newer currentcolor keyword. currentcolor always represents the text color of a certain element. If you want to change another attribute than color to that same element’s text color, you could do that with a declaration like border-color: currentcolor.
Specificity
Specificity means that a rule that is more specific overpowers a rule that is less specific. For example selecting every link inside a footer element with footer a is more specific than selecting every link element everywhere with a.
Some selectors are more specific by default. For example a class selector will always have a higher specificity than an element selector. This makes sense, because selecting only elements with a certain class attribute is more specific than selecting every element of a type.
<html>
  <head>
    <style>
      a {
        color: blue;
      }
      body a {
        color: green;
      }
      .danger-link {
        color: red;
      }
    </style>
  </head>
  <body>
    <a class="danger-link" href="danger.html">I am a very dangerous link, do not click me!</a>
  </body>
</html>
In this example the link will end up red. The first rule for a will be overwritten by the more specific rule body a.
The class selector .danger-link is even more specific, therefore it overwrites them both.
It is important to keep in mind that in the cascade specificity beats the order of rules in your stylesheet. If a rule is followed by another rule with the same specificity, the second rule overwrites the first. If the first rule has a higher specificity, the first rule still overwrites any less specific rules that come after it.
<html>
  <head>
    <style>
      body p {
        color: green;
      }
      p {
        color: blue;
      }
    </style>
  </head>
  <body>
    <p>I am a green paragraph of text because "body p" is more specific than "p"</p>
  </body>
</html>
Most of the time you don’t need to think about specificity too much, but sometimes high specificity can cause bugs or unexpected behavior. You can prevent this by avoiding overly specific selectors, like .site-header nav ul li a. If you want to read more about this, the Mozilla Developer Network has a more detailed article on specificity.